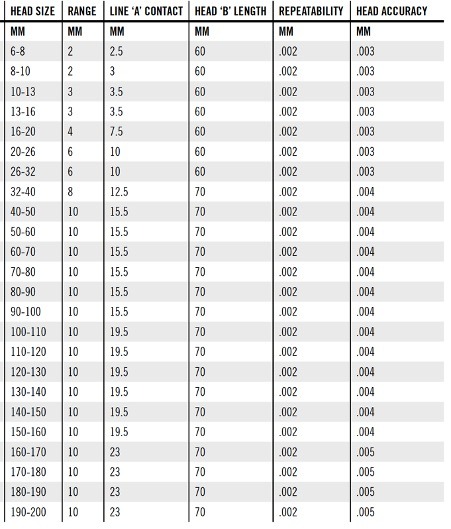
Range Information.
Head Size and Range
Our standard range of 24 heads measures between 2mm and 200mm, with custom heads available for specific applications. Our standard range is highly cost effective and covers most applications.


Line 'A" Contact and Head 'B" Length
Line 'A' Contact refers to the size of the anvils, the component that connects with the bore to be measured. Head length 'B' refers to the size of the measurement head. Our anvils are typically carbide tipped and both the contact and head dimensions can be customised for special applications. In addition a wide range of extensions can increase reach between 10cm and 25m depending on application.
Repeatability and Accuracy
Both our standard ranges and special applications have typical repeatability of 0.002mm, and accuracy of 0.003mm to 0.005mm depending on head size. Higher levels of repeatability and accuracy can be achieved depending on the application and our design service can advise on the best solution for the most demanding applications.
Digital Indicators and Data Capture
Both our standard ranges and special applications are designed to be used with a wide range of indicators, including Mitutoyo, Sylvac and other brands. In addition all our gauges can be fitted with inducers and other data capture devices as part of integrated shop floor systems. Interoperability with other indicators reduces costs and increases flexibility.
Ring gauges and Calibration
All of our standard and special application products can be provided with setting rings or existing setting rings can be used if available. Our ring gauges and and all our products can be provided with calibration certification based on region and specifications
